As the saying goes, a picture is worth a thousand words. If that is true that picture better be a doozie, and quality photography doesn’t usually come without some seasoned skill. Most rookie shutterbugs fall in love with their own pictures and brag how they captured the most stunning expression on their subject’s face, but they are blind to the fact there is a flagpole in the background that looks like it is protruding out of their subject’s head. Many novices think they have captured the best landscape photo with brilliantly colored field flowers with snowcapped mountains framing the shot, but they didn’t notice that there is an overflowing trash can in the foreground that could have easily been framed out if they had just slowed down and did a check of each element within the frame.

Yes, these greenhorns think their photos are stellar, but if their work is critiqued by a pro, usually there are distracting elements caught in the shot that could have been easily avoided.
Now, this article is written not with expensive equipment in mind. What the reader will learn is how to capture the image either by a camera or a phone camera. Photos can be breathtaking simply by their composition, not by the quality or exorbitant cost of the equipment used.
So, what are some tips that can help a beginner take photos like a pro? Here’s a checklist:
Use the rule of thirds. Beginning photographers innately want to put the subject of the photo in the center of the frame. Anything in art such as painting, sketches or photography looks much more stimulating to the brain if the subject is placed on the third line. What third line? Many cameras or phone cameras have a grid that can be selected so the third lines are in place when looking through the frame to take the shot. Place the subject at the intersection of the third line. No grid? No problem. Just mentally divide the viewfinder into thirds and place the subject as shown below.

Look around at the elements captured in the frame. Novices focus their attention on their subject but miss the element in the shot that will cause them regret after that special moment passes never to be captured again. Look for overlooked distracting elements. In the example photo, the girl is framed correctly on the thirds line. A secondary element is also included, the pots of flowers, and even placed on the opposite third line, but because the photographer was mentally focusing on
these rules, he/she didn’t notice the telephone pole that appears to be growing from the subject’s head.

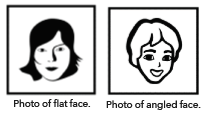
Objects look more attractive if taken on an angle rather than
standing square in front of them. Take real estate, for instance. Most photographers know that if a photo is taken directly in front of a house or building, it will look flat. The building will look much more attractive, however, if the photographer simply walks around the corner of the building to catch two sides. The building has dimension while appearing larger and more attractive.

Take photos of people using the same principles as with buildings. Capturing an angle provides a more flattering look. When a subject looks directly into a camera, their face flattens out. That’s why people hate their driver’s license photo or work I.D. pictures –
the worst pose is captured – but a portrait photographer knows the tip of providing depth to their face. Have the subject turn their head slightly. Perfect. Now shoot.

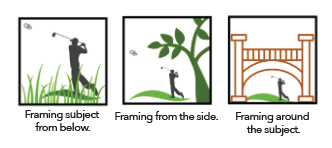
Look around to find a natural element to frame the subject within that visual enclosure. For example, use branches to frame the subject. Perhaps tall grass is the perfect element; lay down and shoot through the blades.

Viewers look at pictures sequentially. That means they take in elements one at a time while their eyes move around the image. Photographers can take photos that purposely plan where the viewers’ eyes move. One way to do that is to use a technique called leading lines. Use an element that provides a line – a railroad track, a path, a road or a fence line – to guide the viewers’ eyes to the focal point. Don’t leave them with leading lines only that line is like the bridge that leads to nowhere. Instead place the subject, the focal point, at the end of the leading lines.

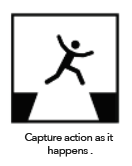
The most engaging photo technique of all is stop action. Sports photos are often stop-action photos. Remember opening a newspaper to the sports section and seeing a basketball player jumping to shoot a hoop and the player was captured in midair? How about a baseball player taking a swing and the photographer caught an image of the ball leaving the bat? Care must be taken so that these photos are not ruined by the blur of the action. If a camera is not fast enough to stop this action, better leave this one alone.

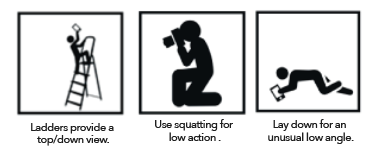
Lastly, most photos are taken from standing height. Not good. If an interesting angle is desired, simply changed the physical stance. Try lying on the ground and shooting upward. How about shooting from a step ladder and shooting downward?

The weather is warming up. Practice before the vacation comes or the kids’ sports season starts. Grab the dog and take a photo of him at his level, not at the photographer’s height. Wait. Look behind the pet and see what is in the background. Is the driveway full of cars behind him? Then simply walk around the animal framing attractive landscaping in the background instead. Remember, even animals look more attractive on a slight angle. Don’t shoot the pet square in the face. Move slightly to catch the animal’s face as if framing a human face, on a slight angle. He will lick a photographer’s hand for it.
TIPS FROM A PRO
Arranging people for a portrait takes more imagination than pointing a camera at the subject and saying, “Cheese!” Broken Arrow photographer David Dietrich has a photography business titled after his name and can capture some dazzling photos. He also has been a second shooter for some recognizable names, one being the “Iron Lady.” Yes, he has been on a photo shoot for the former British Prime Minister Margaret Thatcher. Drawing from his deep well of expertise, Dietrich has advice to help novices showcase a professional look for their photos.
Dietrich says to take advantage of the technology. This is no longer the day of taking photos with film and having to wait a few days to see how the work looks. A photographer can’t overshoot nowadays; they can always delete unwanted photos.
Take numerous shots with the face angled in a variety of ways – chin down or head tilted – and then preview what was just taken. See what is working or what is not flattering and reposition the subject. Have them turn their face slightly and look back at the camera. That slight turn changes the look of the chin, nose or eyes.
Get group or family faces in as much area of the photo as possible. If shooting inside, for instance, stack people behind a sofa with some in front on the sofa. If outdoors, use rocks, logs, steps, anything that can stack them. Place faces where the viewer’s eye flows around the whole photo rather than positioning people in
a straight line.
Dietrich says subjects can get stoic and stiff during a shoot.
A photographer can get natural shots, however, with the camera snapping while interacting with the group, while they are laughing and having a good time. Facial expressions become much more natural as people begin to loosen up.
What to do if a subject has a double chin? This pro says to shoot from above. When the subject looks up into the camera,
it pulls their neck tight.
This seasoned professional suggests if a family has a pet, incorporate Fido into the photo. It makes the family interact authentically. In addition, get the pet to look its best using a miniature reflector or even a squeaker toy to catch the pet’s attention just before the click; it will perk up the puppy.
See More about Photography Basics:
https://www.valuenews.com/photography-basics-news-article_5256

